|
Douglas Instruments
Version 1.0
Screening - using microbatch
Step by Step Instructions for Beginners
Hardware Preparation
Use a ground glass syringe or pipette to dispense 6 ml
decane into a Nunc HLA plate. Tip the plate and remove 4.5 ml. of excess decane, leaving
decane in the wells. Paraffin oil can be used instead, but it sometimes gives less
reproducible dispensing.
Place the Nunc HLA plate in the left side of the
stainless steel frame on the Plate Loader. Place 7 Nunc Strips on the right side, with
water for rinsing the Microtip in the first strip, and your screening solutions in the
remaining six, as shown below.

Connect a 2-channel Microtip to the first two
channels (red and green). Place the tip in the 2-channel "collet" (holder) on
the arm of the Plate Loader. Turn the two lower valves to the flush position ( |- ). Place a small glass vial under the microtip to
collect waste. Use the disposable syringes to fill both bores of the microtip with
pure degassed water. Now turn the lower valves to the dispense position ( T ).
Turn the upper valves of the first two channels to the
fill position ( l ). Fill the ground glass
syringes of the upper valves with degassed pure water and replace them.

Software Preparation
Switch on the computer, and wait until XTGOLD is
loaded. Move to the directory where you would like to save your screening files (e.g.
C:\EXPTS\ASPRUN) and press F9. Select "ASPRUN - screening" from
the menu. (Alternatively you can enter ASPRUN at the DOS prompt.) If a message appears on
screen saying that this is the first time that this directory has been used for saving
files for ASPRUN, press Y to continue.
When ASPRUN has loaded, click on Method,
then select Microbatch screen. The screen will now show a representation of
the plates on the Plate Loader. If desired, click on Edit to change the
numbers of wells, the volume of droplets, the percentage of protein in droplets etc. Note
that V indicates a viscous solution, N indicates a non-viscous solution and R
indicates a rinse well.
When your experiment is ready, press or click on F2
to save it.
With the mouse, click on Run on the menu
at the top of the screen. Select Syringe Control.
Turn the upper valves of the first two channels to the
fill position ( | ) and
press any key.
If you suspect that the motor positions shown are not
correct, press S to rezero the syringes, and P to rezero the Plate Loader.
Finally press ESC.
Debubbling and Setting the Height of the Microtip.
Next debubble the system. At this point the word
"SYRCON" should appear at the top of the screen. Hold down the + key for
a few seconds to dispense a few microlitres from the first syringe. Any air bubbles at the
top of the first motorized syringe will be moved out into the clear tubing. Then press the
¯ key to move the small yellow arrow down to the second
syringe. Hold down the + key again for a few seconds to debubble the second syringe
in the same way.
Now remove the air bubbles from the tubing, leaving it
filled with water, as follows:
- Remove the PTFE tubing from the needles of the two debubbled motorized syringes.
- Expel water and air bubbles from the tubing using the ground glass syringe.
- Reconnect the tubing carefully, ensuring no air bubbles re-enter.
If there are bubbles between the upper and lower
valves, turn the top valves to the flush position (|- )
and flush the bubbles out through the microtip with the ground glass syringes. bubbles out through the microtip with the ground glass syringes.
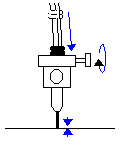
The Microtip may need to be recalibrated to ensure
that it is installed at the correct height. Press T to select Tip
installation. The arm will move to its lowest position. Follow the instructions on the
screen: (1) adjust the height of the Microtip until it is just touching the table.
(2) Tighten the collet. (3) Mark the height by moving the two o-rings down to the top of
the collet. Press ESC to return to the main program.
Running the Experiment
Click on Run, then Dispense.
If this is the first time that this experiment has
been run, wait while the program checks it.
The system will now check the positions of the
motorized syringes. If necessary, they will now be moved in order to carry out the
experiment. Turn the valves as instructed and press any key. When the syringes stop
moving, press any key again.
Turn all valves to the dispense position ( T ). Remove any droplet that is clinging to the Microtip
(using a laboratory wipe) to prevent it from being sucked into the tip instead of air
later on.
A page of configuration information and instructions
will now appear. Press any key to begin the experiment. After loading air, you will
be asked to provide protein. Remove the tip from the collet (the collet remains on the
Z-arm) and dip it into your protein sample (avoiding any precipitate). Wipe the tip,
return it to the collet on the Z-arm and do up the thumb screw.
Press any key to start the experiment, which
will now be carried out automatically. When it is finished, "top up" the HLA
plate with 5 ml 50:50 silicone and paraffin mixture (or 100% paraffin to reduce
evaporation). Place the plate in an incubator at the desired temperature.
Note: The valve positions shown here indicate the desired
connections between the three valve ports. For the old-style valves with levers, the lever
should point to the blocked port. For example, the flush position (|-) corresponds to the lever pointing to the left ( ==o ) on an old-style valve.
|