|
Douglas Instruments
Version 2.0
Screening - using microbatch
Step by Step Instructions for Beginners
Hardware Preparation
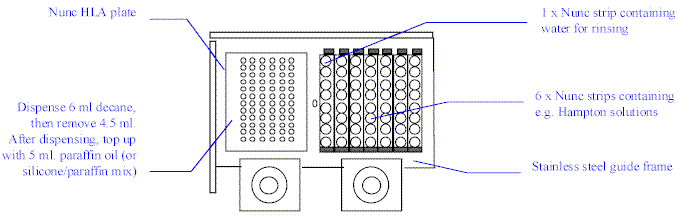
Clean a Nunc HLA plate with compressed air.
Use a ground glass syringe or pipette to dispense 6 ml
decane into a Nunc HLA plate. (Decane is used because its low viscosity encourages the
droplet to adhere to the bottom of the well. Paraffin oil can be used instead, but
it sometimes gives less reproducible dispensing.) Use a syringe or tip the plate to
remove 4.5 ml. of excess decane, leaving decane in the wells.
Place the Nunc HLA plate in the left side of the
stainless steel frame on the Plate Loader. Place 7 Nunc Strips on the right side, with
water for rinsing the Microtip in the first strip, and your screening solutions in the
remaining six, as shown below.
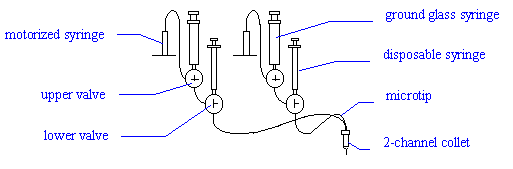
Connect a 2-channel Microtip to the first two
channels (green and red). Place the tip in the 2-channel "collet" (holder)
on the arm of the Plate Loader.
Fill the ground glass syringes of the upper valves
with degassed pure water and replace them.
Software Preparation
Switch on the computer and the MCC control unit.
Start Windows Explorer. Navigate to C:\Crystallization
Experiments\Screens\. Double click on Microbatch Screens.xpp
(the extension may not be visible).
The program Wasprun will load and the
screen will show a representation of the plates on the Plate Loader. If desired, click on Edit
to change the number of wells dispensed, the volume of droplets, the percentage of protein
in droplets etc. Note that V indicates a viscous solution, N indicates a
non-viscous solution and R indicates a rinse well.
When your experiment is ready, press or click on F2
to save it.
Select Run, Dispense.
You will now move to a separate program walled Wasp.
To the left of the start button is a button with an icon showing the dispensing
chassis. Click on this button which will in turn load the program Front
Panel, which is used for controlling the robotics.
If you suspect that any motor positions of the syringe
drivers or the Plate Loader are incorrect, select MCC, Rezero All
Motors and follow instructions.
Debubbling and Setting the Height of the Microtip.
At the beginning of each day the system will require
debubbling. Place a small bottle or vial under the Microtip in the Z-arm, select Syringes,
Debubble, and follow instructions. After debubbling syringes for
about 10 seconds click on the red stop button or press the space bar. Any
air bubbles that were present at the top of the motorized syringes should have passed out
into the connecting tubing.
Now follow instructions and remove the air bubbles
from the connecting tubing as follows:
a. Remove the PTFE tubing from the needles of debubbled motorized syringes.
b. Expel water and air bubbles from the tubing using the ground glass syringe.
c. Reconnect the tubing carefully, ensuring no air bubbles re-enter.
Occasionally there may be bubbles between the upper
and lower valves. Turn the top valves to the flush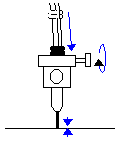 position (|-) and flush the bubbles out through the microtip with the
ground glass syringes. position (|-) and flush the bubbles out through the microtip with the
ground glass syringes.
If you suspect that the 5-channel Microtip is not set
to the correct height select Plate Loader, Install Tip.
The arm(s) will move to its lowest position. Follow the instructions on the screen: (1)
adjust the height of the Microtip until it is just touching the table. (2) Tighten
the collet. (3) Mark the height by moving the two o-rings down to the top of the collet.
Running the Experiment
Press Alt/Tab to return to
Wasp.
The system will now check the positions of the
motorized syringes. If necessary, you will be instructed to turn valves and the syringes
will be moved in order to carry out the experiment.
A page of configuration information and instructions
will now appear. Note that all air bubbles must be removed from all tubes of the first two
channels including the microtip. Remember to remove any droplet on the end of the
microtip to prevent this from being sucked in later on.
Air will now be loaded into the microtip to separate
the protein from water already in the microtip. Some proteins may become denatured
which may cause the air bubble to break up. If you encounter such problems place the
tip in an inert gas such as argon or nitrogen. Click OK to begin
the experiment.
After loading air, you will be asked to provide
protein. Remove the tip from the collet (the collet remains on the Z-arm) and dip it into
your protein sample, avoiding any precipitate. Wipe the tip, return it to the collet on
the Z-arm and do up the thumb screw.
Click OK to carry out the experiment
automatically. When it is finished, "top up" the HLA plate with 5 ml 50:50
silicone and paraffin mixture (or 100% paraffin to reduce evaporation). Place the plate in
an incubator at the desired temperature.
Quit Front Panel before
turning off your computer so that the motor positions are stored for the next use of the
equipment.
|
